Electrical Schematics
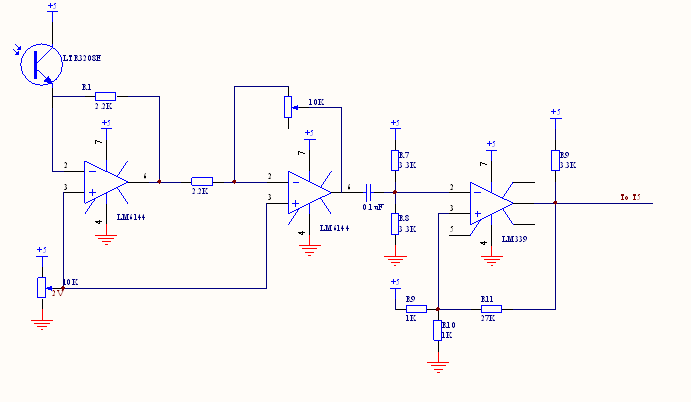
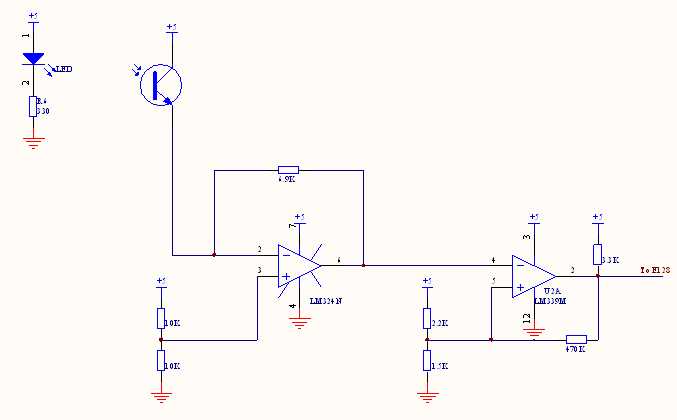
Beacon
Duty Cycle Detector
This
circuit uses a photo transistor to detect infrared light. The signal from the
phototransistor is conditioned with two op-amps and a high-pass filter. The
conditioned signal is then input to a comparator with hysteresis
to generate a clean digital output. The first op-amp linearizes
the output of the phototransistor and the second op-amp has an adjustable gain
to tune the amplification of the signal. The high-pass filter removes the
effects of ambient light.

Sample
calculations:
Stage
1 Op-amp:
![]()
For
photo transistor used, Isat = 1mA
![]()
∆V
= -0.3 V
Stage
2 Op-amp:
Gain:
![]()
Gain
ranges from 11 to 1
Final
change in voltage ranges from 0.3 V to 3.3V
RC
filter:
![]()
![]()
Fc = 965 Hz
This
is well below the frequency of the beacons (1.25 kHz)
Flash
Sensor
Sample
calculations:
Stage
1 Op-amp:
![]()
For
photo transistor used, Isat = 1mA
![]()
∆V
= -0.2 V
Stage
2 Op-amp:
Gain:
![]()
Gain
is 4.55
Final
change in voltage: 0.91V
Contact
Switch
Door
Lock Motor
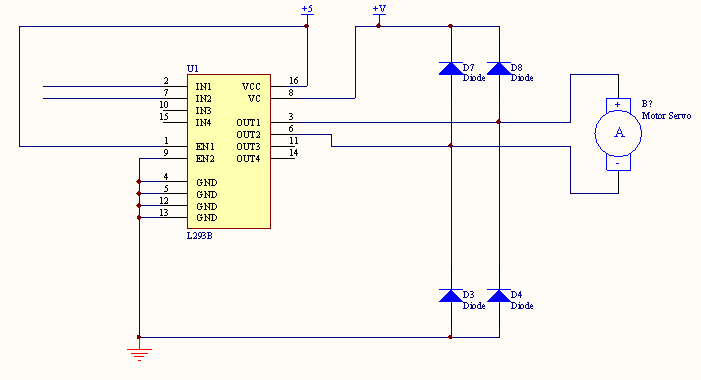
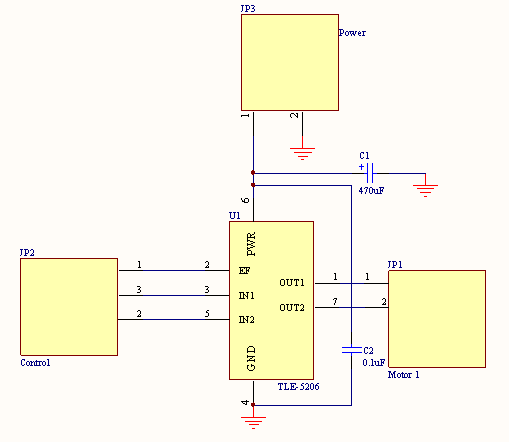
Motor
Driver (2x)
The
motors used for the wheels were driven by the TLE5206 chip. The chip uses
drive-brake mode to drive the motors, with the inputs coming from the E128
microprocessor. The capacitors are used to improve performance by
limiting voltage spikes.
Tape
Sensor (x3)
A
tape sensor consists of a paired infrared emitter and detector. The emitter is
an infrared LED and the detector is an infrared photo transistor. When the
sensor is over a surface that reflects light, the phototransistor saturates and
generates current. When over a surface that absorbs light, the phototransistor
does not generate any current since it cannot detect any light.
Sample
calculations:
Emitter:
Forward
voltage: 1.7 V
Continuous
Forward Current: 10mA
V
– IR = 0
![]()
R
must be at least 330Ω
Collector:
We
wanted to use an op-amp/comparator combination so that different colors could
be sensed. In the end, only one color level was needed, but this transresistive circuit was still used. The resistor
values for the op-amp gain and comparator reference voltage were experimentally
determined to make sure the comparator would be triggered by any tape sighting.
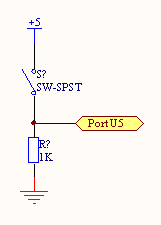
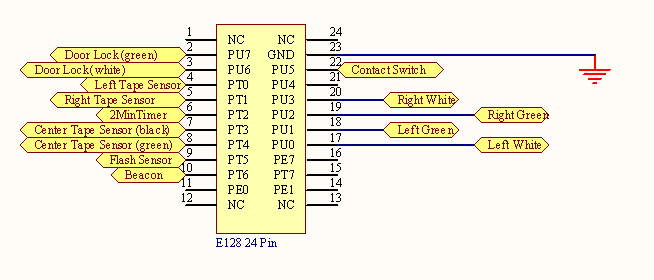
Port
Connections
Only
14 pins on the E128 microprocessor were required for this robot. The port
connections are documented below, and use just the 24-pin connector.
Voltage
Regulator (repeat on each perf board)
This
voltage regulator circuit takes the battery voltage (~7.2V) and downregulates it to 5V, which is used for all the logic
circuits in the system.

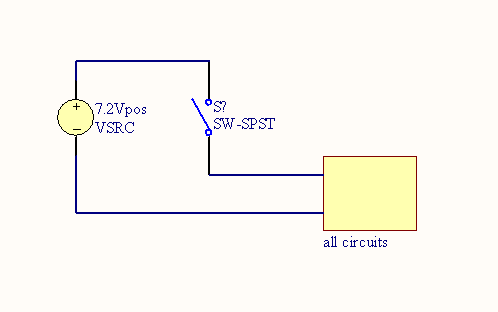
Safety
Switch
This
switch was used to quickly power down the entire system in case of major
malfunction.