Beacon Detectors
Front Beacon Housing:
|
|
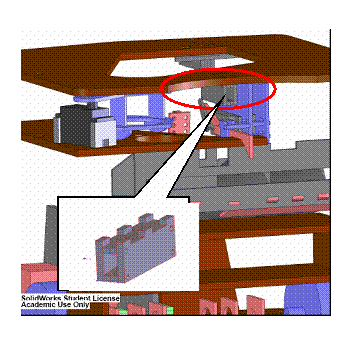
The front
beacon is housed in a masonite enclosure. This was designed to help shield the beacon
detector from picking up signals from beacons that did not face the robot
head on. This beacon was mounted with
the protruding tabs to the underside of the top of the robot. The robot top plate had 6 rectangular
cut-outs with which the protruding tabs from the beacon housing could be
inserted. This beacon was placed at
the same height as the beacons on the playing field, and it was located at
the center of the robot. |
Rear Beacon Housing:
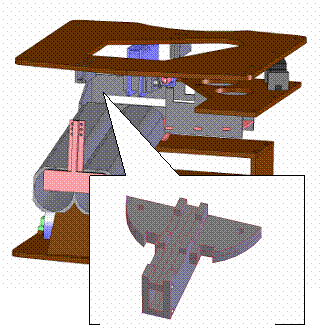
 The three rear beacons were also
housed in Masonite enclosures. The center beacon housing is designed
similarly to the front beacon housing.
It was designed to shield the center beacon from signals that did not
directly face the rear of the robot. The
two beacon detectors on the surrounding the center beacon were not shielded
because these were intended to be used for
detecting signal strength (rather than precise duty cycles) to aide in
active beacon following. The center
beacon would have been used to determine if the robot was pointed at the beacon
with the correct duty cycle. If the
robot veered to the right, then the signal strength on the left beacon would
increase and the signal strength on the right beacon would decrease. From this information, the robot would be
able to correct itself by turning until the signal strength on both left and
right beacons was equal and re-align itself with the beacon and the appropriate
goal. The rear beacon housing was also
mounted to the underside of the robot top plate with the protruding tabs. This beacon detection assembly was located
slightly off center of the robot, placed directly over the dumping chute. The location was chosen because, the robot
was going to use active beacon following to navigate from the ball dispenser to
goal #3. Placing these beacons directly
above the dumping chute ensured that the dumping chute would be aligned
perfectly with the location of the goal #3 box.
The three rear beacons were also
housed in Masonite enclosures. The center beacon housing is designed
similarly to the front beacon housing.
It was designed to shield the center beacon from signals that did not
directly face the rear of the robot. The
two beacon detectors on the surrounding the center beacon were not shielded
because these were intended to be used for
detecting signal strength (rather than precise duty cycles) to aide in
active beacon following. The center
beacon would have been used to determine if the robot was pointed at the beacon
with the correct duty cycle. If the
robot veered to the right, then the signal strength on the left beacon would
increase and the signal strength on the right beacon would decrease. From this information, the robot would be
able to correct itself by turning until the signal strength on both left and
right beacons was equal and re-align itself with the beacon and the appropriate
goal. The rear beacon housing was also
mounted to the underside of the robot top plate with the protruding tabs. This beacon detection assembly was located
slightly off center of the robot, placed directly over the dumping chute. The location was chosen because, the robot
was going to use active beacon following to navigate from the ball dispenser to
goal #3. Placing these beacons directly
above the dumping chute ensured that the dumping chute would be aligned
perfectly with the location of the goal #3 box.
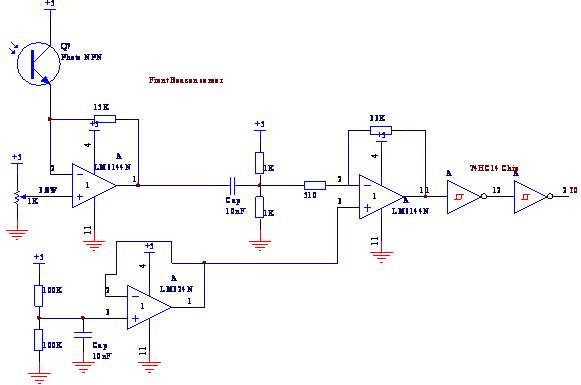
Beacon Detection
Circuits:
The four
beacon detection circuits were designed identically and consisted of a
transresistive circuit, a high pass filter, an amplifying stage, a Schmidt
trigger and an inverter. The first stage
was a transresistive stage (using a high speed rail to rail op amp - LM6144). This stage had a gain of 15 to ensure that
the signal was amplified to be larger than signals coming from noise. The output of the first stage was fed into a
high pass filter with a cutoff frequency of ~600 Hz.

This filter
allowed the signal of interest (beacons emitting at 1.25KHz)
to pass through while blocking out ambient light. The second stage had a gain of 65 to ensure
that the signal could be amplified enough to trigger the thresholds of the
Schmidt trigger. The gain on this stage
should not be so large as to saturate the op amp. The output of the second stage op amp was then
fed into two Schmidt triggers to create a duty cycle waveform that would be fed
into the E128.
A note
about virtual ground: Virtual ground was
chosen to be at 2.5 V because we were using an HC14 Schmidt trigger which has
its hysteresis band centered around
2.5V. The virtual ground was designed
using an LM324 in a buffer configuration.
The 10nF helps keep the voltage steady at 2.5V.